Organized HSA Record Keeping


Update: Unhappy with my previous record keeping attempts, I created an online software called TrackHSA, a service to help manage your Health Savings Account. Track purchases, upload receipts, and record reimbursements for all HSA purchases to help you minimize your taxes and satisfy the IRS.


TrackHSA record keeping

You can learn more about TrackHSA here.

Overview

There are a number of reasons to setup a simple, organized system for maintaining your health savings account records.  Due to its tax advantaged nature, your HSA has implications for your income taxes, so it is important to keep proper records.  If – God forbid – you are ever audited by the IRS, you will already have all relevant information at hand. Perhaps more importantly, this system allows you to track your unreimbursed qualified medical expenses. This ensures you never pay too much in tax while knowing how much you can pull from your HSA, tax-free, in the event of an emergency.

The major complication with an HSA is the length of time between contribution, spending and reimbursement. Depending on your age, you could have 40+ years until you need to provide proof of spending. This especially applies if you are young and saving for the long haul. For example, if I pay for QME out of pocket at age 25, I may not need to reimburse myself – depending on my financial condition – for that expense until I am 55. This is part of the strategy of using your HSA as an ATM.

Luckily, there are simple cloud-based solutions that can help retain your records. I have written TrackHSA just for this application, but you could also use Dropbox or Google Drive to backup any and all information on offsite, secure servers. In theory, this is a fail safe and secure way of backing up your HSA receipts. I also back up this same information on my external hard drive but this is prone to fail.

My HSA Record Keeping System

Keeping appropriate records for your Health Savings Account is easy with dedicated software. Given all of the manual storage (and risk) you can read about in my old system below, I needed an online software that tracked and stored all of my HSA transactions and receipts. I didn’t want to run the risk of it getting lost / deleted, and I needed it to be secure and able to do the work for me. So I set out to build TrackHSA, and that is what I did.


HSA Summary Page

TrackHSA functions as a both a listing and calculator for your HSA activity. While your HSA bank account can tell you the amounts that go in and out of the account, it does not characterize those transactions in relation to an HSA. For example, say you withdrew $200 from your HSA last month. Without context, you will not know if that $200 was for a purchase (no receipt), a prior reimbursement (no transaction context), or an unqualified withdrawal (no notes). TrackHSA fixes this by providing context to your HSA from the transaction perspective, putting the focus on uses of your HSA for qualified medical expenses. By tracking the actual HSA transaction, you can not only upload the receipt to justify the expense to the IRS should they audit you, you can track whether or not that purchase has been reimbursed. Delaying reimbursement is a great strategy to let your tax advantaged HSA account grow, and TrackHSA helps you justify the reimbursement when you do so down the line.

How I use TrackHSA.com

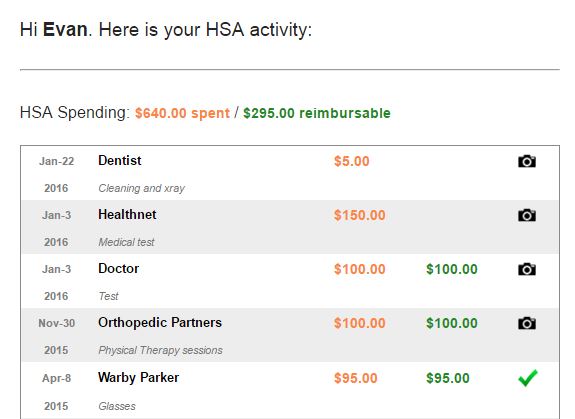
Whenever I make a qualified medical expense, I log it in TrackHSA. When you login you can see a summary of your HSA activity. On the right, you can enter a new purchase and categorize it. You can record detailed information about the purchase, including the provider, description, amount paid, amount reimbursed (important!), HSA category, payment method, and free form notes. This information comes in useful when you need to reimburse prior purchases or determine if a transaction was HSA eligible.

Saving an HSA purchase

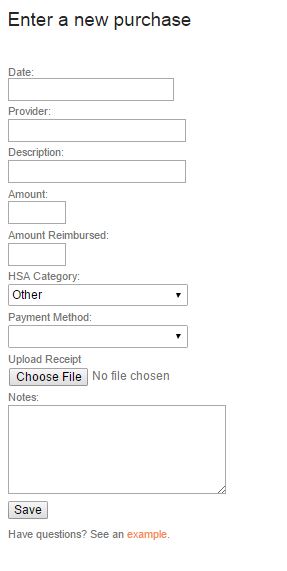
Only 3 fields are required so you can quickly create purchases and come back and add more information later. When creating the transaction, you can optionally upload an image of the receipt. This is a best practice because it confirms that the transaction occurred, especially in the eyes of the IRS. Uploading is simple and the image is stored securely to your account, and no one else has visibility to it.

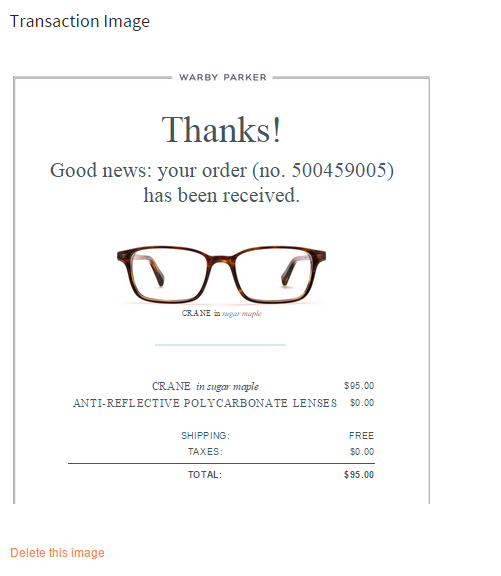
Once uploaded, the camera icon on the summary screen becomes a green checkbox indicating that the transaction has a receipt. When you click on that transaction for more detail, the image is displayed so you can reference it. You can also download it in its original form for your records later on.

HSA receipt image glasses

Overall, this is a simple system for managing your HSA spending and receipts. I will be adding more features to it in the future, but it can serve as a tool for helping you maintain your HSA records and audit proof yourself in case the IRS comes knocking. Moreover, it will put you on top of your finances and help you maximize your Health Savings Account.

Note: the following section was the initial meat of this post and I am keeping it for history’s sake, in case you want to setup your own HSA record keeping on your computer.

My Old System circa 2013 (pre TrackHSA)

I update my records 4 times a year, at the end of each quarter. I can usually accomplish this record keeping in less than 1 hour per quarter. Sometimes I cheat and add QME receipts as they come in so I don’t lose them, but would like to move this to a once a quarter filing system.

In my Dropbox folder, I have a folder called HSA with the following subfolders:

  • Statements
  • Unreimbursed QME
  • Reimbursed QME

Here is what this folder looks like.  The green check marks mean it is synced to Dropbox and up to date.

Photo of HSA folder, with labled subfolders


The function and characteristics of each folder are such:

    • Statements– I download my quarterly statement from HSA Bank, my HSA provider. This details all account contributions and withdrawals that occurred in a given quarter.  It is a good reference and could help reconcile your account as needed.

      I label my statements in the format [HSA Statement 1 2012], where the first number denotes the quarter.


    • Unreimbursed QME– I keep copies of all invoices or receipts for QME that I have incurred throughout the year.  In this folder are items that are unreimbursed.  In other words, I paid for medical care out of pocket instead of using my HSA.  Doing so allows my HSA to grow and compound.  I save each receipt by either scanning (old school) the invoice or taking a clean picture (new school) using my camera.  I name the files in the format of [Date-Company-Amount] (e.g. 2012-12 Kaiser $45) so I can sort through them quickly.

      A nice benefit of this system is that the sum of all invoices in the Unreimbursed QME folder equals the amount I can pull from my HSA tax-free.


    • Reimbursed QME – This folder contains copies of invoices or receipts that I have paid for with my HSA.  There are two ways that I can pay using my HSA.  The simplest way is to buy using my HSA Bank debit card.  This is straightforward and doesn’t require any further accounting; the receipt begins and ends in Reimbursed QME. However, that money is now gone from my HSA.

      Alternatively, I can purchase the medical care out of pocket using cash, credit card, or check.  Since the purchase was considered a Qualified Medical Expense, I can reimburse myself for that purchase from my HSA (tax free dollars).  This is effectively the same as paying for the QME with my HSA.  However, I may choose to delay that reimbursement so my HSA funds can grow.

      Using this method, once the reimbursement ($ transfer from HSA to my personal checking account) occurs, I simply move the invoice from the Unreimbursed QME folder to the Reimbursed QME folder.  This finalizes that QME, and my new (lower) amount of UQME is reflected by the contents of that folder..


  • Excel Spreadsheet – I created a simple Excel spreadsheet that summarizes all out of pocket spending for qualified medical expenses.  I update this sheet when I 1) incur new UQME cost (add) or 2) reimburse myself for UQME (reduce).  This sheet conveniently shows a total for UQME, or the amount you can withdraw from your HSA, tax free. That total should balance with your receipts in your UQME folder.  You can download a free copy here.

In the end, do whatever works for you. Just make sure you have all needed information, especially the Unreimbursed QME portion.  This is money you are entitled to withdraw, tax free.  If you aren’t tracking it, who is?

There are only a few folders and a few actions that I perform once a quarter. In return, I have piece of mind of knowing the value of my accounts as well as how much I can pull from the HSA in case of emergency.  I am also covered in the event of an audit.

Let me know if you need any help getting your system setup.


TrackHSA record keeping

Using your HSA as an ATM

We already know that a health savings account is a terrific savings vehicle because it is triple tax advantaged, which allows you to pay for medical care with tax free dollars.  We also know that your HSA is yours forever, and that you can invest and grow your savings for long periods of time.  This presents the opportunity – given diligent savings and investment – to grow your HSA into a certified nest egg, for either medical care or retirement.

But there is another major advantage that can help you along the way.  You can design your HSA so that you can pull tax free cash from it at any time.  In this way, it acts as your own personal ATM.

Of course, there is no free lunch.  To pull money out of your HSA tax and penalty free, you must do so by reimbursing yourself for previous qualified medical expenses that you paid out of pocket.  This means that at some point in the past, you simply paid for QME out of pocket (credit card, cash, check) instead of using your HSA debit card or check.  Any QME paid out of pocket can be reimbursed from your HSA at any time, tomorrow or in 30 years.

As a simple example, suppose I go to the doctor and pay the $45 copay out of pocket. Since this is a qualified medical expense, I am entitled to reimburse myself from my HSA at any time.  This reimbursement is simply a transfer of $45 from my HSA to my checking account.  No paperwork, no taxes, no mess.  Just a simple transfer.  Tracking this by keeping proper records ensures you maximize your tax free withdrawals and don’t make mistakes.

Unreimbursed QME Credits
You can begin to see the advantage here.  The more QME I pay out of pocket now, the more I can reimburse myself for in the future.  Depending on how often I do this, I can accumulate a fair amount of unpaid reimbursements.  $25 here, $45 there, $100 the following month.  Eventually, I have a lot of cash in my HSA that I am entitled to draw from for reimbursement.

I have termed these credits Unreimbursed QME (creative, I know).  These represent amounts that I can pull from my HSA, tax free, at any time for reimbursement.  While I wouldn’t reimburse myself to purchase baseball tickets, it does serve as a backup emergency fund should such an event arise.  It is nice to have this available should I need it.  Of course, I would rather keep cash in my HSA so it can grow, tax free.

Unreimbursed QME goes back to the essence of saving and personal financial: sacrificing consumption today to enjoy a better tomorrow.

The Benefits of UQME
Paying medical expenses out of pocket isn’t necessarily fun, as it takes from my monthly budget.  At the same time, one of my goals is to pay for as much QME out of pocket as possible.  Why is this?  There are three reasons:

  1. My HSA is one of my savings accounts, and I aim to protect it.  I am much happier spending $45 out of pocket than reducing my HSA by $45.  I want that account to grow, and you can only contribute so much each year.  In my monthly budget, I have a line for HSA contributions (savings) and a line for random medical (expense).  This prevents small medical spending from chipping away at my HSA.
  2. Speaking of growing, there is a huge benefit to allowing your HSA to grow and compound.  Spending it ‘early’ reduces the amount that can compound, which limits the potential growth of the fund.  You need your money working for you for as long as possible. For example, it would be nice to keep that $100 in your HSA, invest it for 7 years, allowing it to double. Then, you can reimburse yourself with ‘the house’s’ money.
  3. Moreover, I view the UQME as a safety net.  I like the option of being able to pull cash from the HSA if I need it, with no tax implications.

Thus, whenever I pay QME out of pocket I feel good as I am protecting my HSA, letting it grow, and establishing a ‘line of credit’ that I can pull from at any time.  Hopefully I won’t need it, but it is nice to know that it is there.

I bet you can’t do that with your copays on your ‘other’ health insurance plan.


The Benefits of an Emergency Fund

Stuff Happens
Unfortunately, bad stuff happens from time to time.  Your car breaks down, a medical emergency comes up, something on your home requires repair.  These problems rarely provide much notice and thus escape the usual process of budgeting and planning.  Instead, they present themselves (at the most inopportune time) as a large bill with little alternative but to pay.  Sometimes, the amount on the bill contains a comma.  Depending on your preparation, this can be either a nightmare or a small bump in the road.

By definition, these events are mostly out of your immediate control.  As such, you can only control how you prepare for them and how you react to them.  Creating an emergency fund (I keep mine at ING Direct) is a smart way to be ready for life when it hands you lemons.

What is an emergency fund?
An emergency fund is easy to understand but takes discipline to implement.  The concept is fairly self explanatory – it is an amount of cash that is spent only on emergencies.  There are two key parts to this definition:

  1. Cash – this implies that there is actual money in the bank, ready and waiting.  Over time, this can be built up by monthly contributions.  This requires that present consumption be reduced in exchange for future stability.
  2. Spent only on emergencies – a pile of cash sitting in the bank is tempting.  However, this fund cannot be squandered but used only for emergencies only.  And to be clear, that new pair of shoes or last minute trip to Vegas do not constitute emergencies.

Those stuck in a continuous cycle of debt often suffer from 1) overspending and 2) a lack of an emergency fund.  The overspending prevents debt reduction, while new spending and interest adds to the total.  Periodically, any break down / repair / large bill that occurs is paid with even more debt.  This destroys any progress made paying down the debt.  When a financial emergency arises, they are thrown back underwater, and the cycle repeats.

Benefits of an emergency fund
There are many benefits to having an emergency fund.  Most share the common theme of ensuring future stability, which comes in many forms.

At its simplest, an emergency fund is a way of forced savings.  Each month, you contribute money until you reach your target amount.  Instead of spending, you are saving.  Instead of sending money out the door, you are putting money in the bank.  The confidence and peace of mind that comes with being able to handle financial emergencies is invaluable.  For those serious about their finances, this is the first step to ensure stability and safety.

An emergency fund can also protect you from unemployment.  If your job is your primary source of income, it will be very difficult to pay your living expenses if your job vanished tomorrow.  The better alternative is to have savings in the bank that allow you to live comfortably for a time while searching for a new job.  This would involve having a few month’s worth of living expenses saved, just in case.

Emergency fund strategies
There are various theories about how to construct your emergency fund.  While the end result is an amount of money you keep in the bank, the deciding factors are critical as they force you to think.  For example, in developing your own emergency fund, relevant questions may include:

  • What financial risks exist (car repair, health care deductible, etc.)?
  • Who are my dependents?
  • What are my monthly expenses?
  • How secure and stable is my income?
  • What amount of money do I need to be comfortable/safe?
  • What other investments/assets do I have?

Since every situation is unique, emergency funds vary in size.  They can range from a few hundred dollars to over a year’s salary.  I think somewhere in between is a happy medium.  You want to be able to cover any of your deductibles without problem.  Often times, you will hear these figures quoted in terms of living expenses.  For example, I want to have 3 months living expenses in my emergency fund.  This would cover a temporary job loss and provide a nice cushion of cash reserves.

Some may counter, “I could never save that much money”.  My question to them is, “What do you spend your money on?”  Each month, we make choices about where our money goes.  It is up to us to insure that our desired future is aligned with today’s actions.

Setting a goal and taking action
After considering your own situation in terms of the criteria above, you can create an emergency fund by taking the following actions:

  1. Define your goal – This depends on your situation, and it can have multiple stages.  For example, my immediate goal is to have $1k in my emergency fund (completed June 2012).  My longer term goal is to have 3 months living expenses in the bank, which is around $4k.
  2. Create an account – You can use any bank account for your emergency fund.  I do not recommend keeping in your checking account (or under your mattress!) as it is too easy to spend.  Instead, a free ING Direct account is great as it segregates the emergency fund, which makes it ‘official’.  This also creates a barrier so I am not tempted to pull from it, although it is there if I need it.  These accounts pay good interest and I enjoy their handy sub account feature.
  3. Automatic contributions – Using my ING Direct account, I created an automatic contribution that occurs towards the end of each month.  This automatically transfers money from my checking account, and I don’t have to worry about it or remember it.  It also prevents me from ‘forgetting’ to transfer the money.  Savings and automation are key.

Best of all, this is something you can do in the next 15 minutes.  Create an account, setup automatic contributions, and you are well on your way to a more stable financial future.