Tag Archives: Record Keeping

How to File HSA Tax Form 8889

Update: There has been a lot of questions about Form 8889 and this is one of the most popular pages on the site. Knowing Form 8889 is a beast, I created EasyForm8889.com to fill it out for you. Just answer simple questions and in less than 10 minutes, you download a completed Form 8889 PDF. Hope you like it – thanks!

Overview

If you have an HSA account and have activity in it during the year, you are required to file IRS Form 8889, which is a tax form used to report HSA contributions, distributions and tax deductions. While this may sound like a pain, don’t worry, it isn’t too bad. Moreover, doing so insures that your contributions are tax exempt, a key part of the HSA’s triple tax advantage. It also prevents you from paying excessive penalties or taxes.

Here is a copy of IRS tax Form 8889 for 2015 so you can see what it looks like.

I have created the following video to walk you through Form 8889. In it, I provide explanations and examples for each section and line, so that you can file your Form 8889 with confidence. The transcription of the information is below.

Watch on Youtube: How to File HSA Tax Form 8889

Who is required to file Form 8889 for their Health Savings Account?

  • You (or someone on your behalf, i.e. an employer) made contributions to your HSA during the year
  • You received HSA distributions (cash transferred out) during the year
  • You over contributed to your HSA, likely by using the Last Month Rule last year but violating the Testing Period.
  • You acquired an HSA due to the death of the account beneficiary

What tax forms you will need

  • IRS Form 5498-SA (contribution activity, provided by HSA custodian)
  • W-2 Form (if your employer made HSA contributions)
  • IRS Form 1099-SA (distribution activity, provided by HSA custodian)
  • IRS Form 8889 and the Form 8889 Instructions (check that your tax software prompts you for HSA information)


EasyForm8889.com - complete HSA Form 8889 in 10 minutes!

How to fill out Tax Form 8889

Definitely view the Instructions for Form 8889 if you need help or have a complicated case. With those by your side, just go through each line one at a time and consider what it is asking. Populate that data before moving onto the next one. If you get stuck, check the Instructions or the above video for my advice.

If you are filing your taxes electronically, be sure to look out for any questions relating to HSA’s on the standard forms. Checking them correctly will trigger the software to include tax form 8889 automatically into your tax preparation so that you don’t miss it. If in doubt, search or call the company you are using.

In sum, the form is trying to establish 3 things:

  • Amount of HSA Contribution
  • Amount of HSA Distribution
  • Total Income or Additional Tax Due

Let’s take a look now at each section and each line of Form 8889

Part I – Contributions and Deduction

This part of the form asks you to verify that you were covered under a high deductible health plan during the year in question, how much you and then your employer contributed, and calculates your contribution amount was for the year. This contribution amount is the actual amount you can deduct from your taxable income, so it is very important. This calculation occurs on Line 3 of Form 8889 and can be tricky, so pay attention there.

  1. Line 1 – Select a plan to indicate your coverage (Single or Family) for the year. If your plan changed during the year, choose the plan that was in effect the longest. You will square this up on Line 3, Contribution Limit.
  2. Line 2 – Your HSA contributions – see Form 5498-SA from your HSA custodian. Do not include employer contributions, those go in Line 9.
  3. Line 3 – Your contribution limit for the year – very important. If you had the same HSA eligible insurance for the full year, simply enter that contribution limit here (2015: single=$3,350, family=$6,650). If your insurance changed, you will use a pro rata methodology. See the instructions (and the Youtube video has a good example of this) but going by month, sum the yearly contribution limits for the year, then divide by 12. That is your contribution limit. If you joined an HSA this year, you can contribute the full amount under the Last Month Rule. However, you will have to maintain coverage into next year per the Testing Period or face a penalty.
  4. Line 4 – Archer MSA activity. For most people, this is $0. If you have an Archer MSA (an antiquated precursor to the HSA), see the instructions to populate this amount.
  5. Line 5 – Subtraction.
  6. Line 6 – If you and your spouse both have an HSA and are covered under a family plan, you can decide how to allocate the income tax deduction from your HSA. This may be beneficial for tax purposes in certain situation. If this applies to you, see the Instructions to calculate this amount.
  7. Line 7 – If you are 55 or older and have family coverage, you are eligible for additional contribution to your HSA above the limit. See instructions to determine this.
  8. Line 8 – Addition
  9. Line 9 – Your employer contribution to your HSA. If this is not on the form 5498-SA you received from your HSA provider, you can find it on box 12 of your W-2 marked with code “W”.
  10. Line 10 – This is rare, and a described line. For line 10, Qualified HSA funding distributions refers to distributions from IRA / Roth IRA accounts to your HSA. This does not mean distributions our of your HSA, say for qualified medical expenses. That will occur in Part II, line 14a.
  11. Line 11 – Addition
  12. Line 12 – Subtraction. This makes sense – notice how it is reducing your contribution limit by any amount that your employer contributed. This prevents you from having both a large personal and employer contribution, and enjoying all of that tax reduction / money from both.
  13. Line 13 – Important – this is the actual amount you can deduct from your income per HSA tax law. This will make its way onto Form 1040, line 25, and is an important mechanism for how the HSA tax deduction works. By reducing your taxable income, the HSA allows you to pay less in taxes.
  14. Part II – Distributions

    This part of the form looks at money you removed from the HSA and verified it was spent properly. If not, it assesses a penalty.

  15. Line 14 – Distributions from HSA
    • a) These are funds you took out of your HSA during the year. This can occur in many forms – bank transfer to reimburse yourself, cash withdrawal from HSA, HSA debit card purchase, or check written against your HSA. All of these amounts need to be added up and included here. You can reference form 1099-SA for distribution activity.
    • b) HSA rollovers – only if you physically received a check to deposit into another HSA account. Or if you over contributed for the year and then withdrew that money to true up. They will remove these amounts from line 14a since it does not truly count as a spent distribution.
    • c) Subtraction
  16. Line 15 – Very important. Now that we know how much you removed from your HSA in 14c, the government wants to know how much of that was spent on qualified medical expenses. They do not ask for proof at the time you file taxes, but they will certainly audit this value if you are so lucky. Any amount greater than box 14c will be penalized.

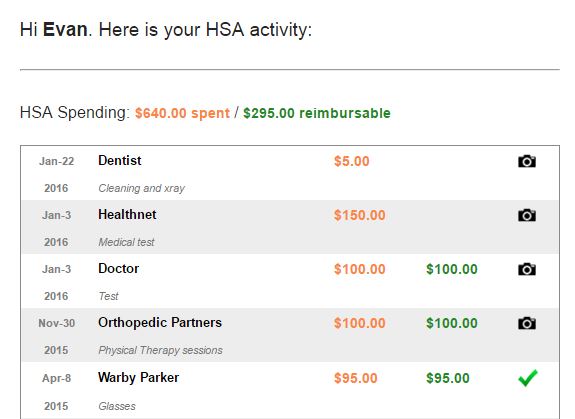
    This is why TrackHSA is so valuable – you can view your account and verify all activity that came from your HSA was legit. You can even upload receipts to back it up. So if Uncle Sam comes knocking for an audit, you can easily compile all information to defend yourself.

  17. Line 16 – This subtraction determines if you spent any HSA proceeds on non qualified medical expenses. If you get a positive number here, you are going to owe tax and penalty (20%, 17b) on it, so you should go back and reconsider what you are doing. This amount makes its way onto Form 1040 as “Other Income”, which will be taxed.

    Another plug for TrackHSA. Say you spent more on qualified medical insurance than you distributed from your HSA. This is actually a smart move because you are allowing that money to stay in your HSA, invest and grow, instead of spending it. I call this amount “unreimbursed qualified medical expenses” and it puts you ahead of the game. Moreover, you can later distribute that money from your HSA should you need it. I call this “using your HSA as an ATM“. TrackHSA will maintain this purchase amount for your as “unreimbursed amount”, so that in the future you can reimburse yourself for it and populate it that year’s HSA tax form. TrackHSA let’s you substantiate it later on, proving it was legit.

  18. Line 17 – Penalty on excess distributions. If you have a positive # in Line 16 it means you mispent your HSA fund on non qualified medical expenses and the penalty occurs here.
    • a) If you had a positive number in Line 16, you have one last change to avoid penalty if 1) you turned 65 2) became disabled or 3) the account holder died. See instructions for specifics.
    • b) Penalty time. If nothing in 17a pertained to you, you have to pay a 20% penalty on your excess distributions from line 16. Not fun. This makes its way back to Form 1040 on line 62 as Other Taxes (read: penalty) from “HSA”.
  19. Part III – Taxes and Penalties from Last Month Rule

    In this section, the form assesses additional taxes and penalties for 1) previously violating the Last Month Rule and 2) HSA funding Distribution from IRA/Roth IRA. These amounts will make their way to Form 1040 and be taxed (line 20) and penalized (line 21), so best to avoid this if possible.

  20. Line 18 – Uncommon – for most people this is $0. The naming here is very vague, but if you look at the instructions, this only applies if:
    1. In a previous tax year, you utilized the Last Month Rule AND
    2. Later ended your HSA insurance early, violating the Testing Period.

    If this is the case, you in fact over contributed and will need to enter the excess amount you contributed from the Last Month Rule compared to if you hadn’t used it. In other words, by how much did you over contribute? For example, if you began insurance on July 1st and take advantage of the Last Month Rule for the year, you would benefit from an increased contribution limit of 6 months (Jan – Jun). In that case you would enter enter a number which equals 6/12 * Contribution Limit. See Form 8889 Instructions and the Line 3 worksheet to calculate if needed.

  21. Line 19 – Uncommon – for most people this is $0. This goes back to Line 10 where you enter the amount of any funding distribution from a IRA/Roth IRA going into your HSA. Whatever this is the government doesn’t like it, and is going to tax and penalize you on it..
  22. Line 20 – Here, you add up lines 18 + 19 and add this back as Other Income on Line 21 of Form 1040. This is not good because this amount is going to be taxed.
  23. Line 21 – To add insult to injury, not only does the government tax you on the amount of line 20, it penalized it by 10%. This amount makes its way to Form 1040 on Line 62 as “Other Taxes” (read: penalty) and you will have to pay this amount to the government.

Conclusion

So that is a lot of detail and a lot of information, but hopefully it makes filing Form 8889 much easier for you. In the end, just verify where amounts are flowing to Form 1040 and make sure where you want them to be (reducing Taxable Income) and not as as penalties (adding to Taxable Income or as Other Taxes).

————————————

Note: if you have an HSA, please consider using my service TrackHSA.com to manage your Health Savings Account. You can store purchases, receipts, and reimbursements securely online. Start for free today.

TrackHSA logo

Consider Start Dates for Health Insurance Applications

Throughout life, the need to change health insurance providers or plans may arise. For example, you may:

  • Need to add a dependent or spouse to your plan
  • Move from an employer sponsored plan to an independent plan
  • Change your policy with different care options
  • Start a new, individual health insurance plan

If you plan on making such a change, you definitely want to consider how long application approval can take.   One may (rationally) assume, “I’ll submit my application, be approved within 24 hours, and coverage will be in place.”  Unfortunately -like many things in health insurance- approval is not that fast or easy.  What’s worse is that your application has a chance of being rejected, which would leave you back at square one.

Looking at a recent health insurance application reveals that this provider only offers two start dates per month for when coverage begins.  These are the 1st and 15th of each month.  That’s it.  Whether this results from streamlining accounting/operations, approval time, or incompetence, the world may never know.   Other providers may be the same, and this is worth noting.  The goal is not to allow a gap in coverage to occur, as this creates a condition of unlimited medical liability should something awful happen.

With most things in life, it is best to prepare and apply early.  If you will require an upcoming change in coverage, it is best to apply now and begin the process.  You can always elect for the coverage to begin in the future, but if you wait until the last minute, you may temporarily go without insurance coverage.  Applying 30-60 days in advance seems to be a safe time horizon.

Here are some steps you can take to prepare for making the switch:

  • Examine your situation.  What type of coverage do you need?  How much does your budget allow?  What amount of deductible are you comfortable with?  Do you prefer a PPO or HMO?
  • Begin researching how insurance plans are compared and what each term means.
  • Have your medical records handy, as you will need information on past insurance as well as any doctor’s visits.  Here is a good system for organized medical record keeping.
  • Find a broker that allows you to compare plans.  I recommend ehealthinsurance.com
  • Compare quotes and plan offerings, select one and begin the application process.

Hopefully -with a little foresight and planning- you can avoid the risks associated with being uninsured and your insurance transition will be smooth and painless.


Organized HSA Record Keeping


Update: Unhappy with my previous record keeping attempts, I created an online software called TrackHSA, a service to help manage your Health Savings Account. Track purchases, upload receipts, and record reimbursements for all HSA purchases to help you minimize your taxes and satisfy the IRS.


TrackHSA record keeping

You can learn more about TrackHSA here.

Overview

There are a number of reasons to setup a simple, organized system for maintaining your health savings account records.  Due to its tax advantaged nature, your HSA has implications for your income taxes, so it is important to keep proper records.  If – God forbid – you are ever audited by the IRS, you will already have all relevant information at hand. Perhaps more importantly, this system allows you to track your unreimbursed qualified medical expenses. This ensures you never pay too much in tax while knowing how much you can pull from your HSA, tax-free, in the event of an emergency.

The major complication with an HSA is the length of time between contribution, spending and reimbursement. Depending on your age, you could have 40+ years until you need to provide proof of spending. This especially applies if you are young and saving for the long haul. For example, if I pay for QME out of pocket at age 25, I may not need to reimburse myself – depending on my financial condition – for that expense until I am 55. This is part of the strategy of using your HSA as an ATM.

Luckily, there are simple cloud-based solutions that can help retain your records. I have written TrackHSA just for this application, but you could also use Dropbox or Google Drive to backup any and all information on offsite, secure servers. In theory, this is a fail safe and secure way of backing up your HSA receipts. I also back up this same information on my external hard drive but this is prone to fail.

My HSA Record Keeping System

Keeping appropriate records for your Health Savings Account is easy with dedicated software. Given all of the manual storage (and risk) you can read about in my old system below, I needed an online software that tracked and stored all of my HSA transactions and receipts. I didn’t want to run the risk of it getting lost / deleted, and I needed it to be secure and able to do the work for me. So I set out to build TrackHSA, and that is what I did.


HSA Summary Page

TrackHSA functions as a both a listing and calculator for your HSA activity. While your HSA bank account can tell you the amounts that go in and out of the account, it does not characterize those transactions in relation to an HSA. For example, say you withdrew $200 from your HSA last month. Without context, you will not know if that $200 was for a purchase (no receipt), a prior reimbursement (no transaction context), or an unqualified withdrawal (no notes). TrackHSA fixes this by providing context to your HSA from the transaction perspective, putting the focus on uses of your HSA for qualified medical expenses. By tracking the actual HSA transaction, you can not only upload the receipt to justify the expense to the IRS should they audit you, you can track whether or not that purchase has been reimbursed. Delaying reimbursement is a great strategy to let your tax advantaged HSA account grow, and TrackHSA helps you justify the reimbursement when you do so down the line.

How I use TrackHSA.com

Whenever I make a qualified medical expense, I log it in TrackHSA. When you login you can see a summary of your HSA activity. On the right, you can enter a new purchase and categorize it. You can record detailed information about the purchase, including the provider, description, amount paid, amount reimbursed (important!), HSA category, payment method, and free form notes. This information comes in useful when you need to reimburse prior purchases or determine if a transaction was HSA eligible.

Saving an HSA purchase

Only 3 fields are required so you can quickly create purchases and come back and add more information later. When creating the transaction, you can optionally upload an image of the receipt. This is a best practice because it confirms that the transaction occurred, especially in the eyes of the IRS. Uploading is simple and the image is stored securely to your account, and no one else has visibility to it.

Once uploaded, the camera icon on the summary screen becomes a green checkbox indicating that the transaction has a receipt. When you click on that transaction for more detail, the image is displayed so you can reference it. You can also download it in its original form for your records later on.

HSA receipt image glasses

Overall, this is a simple system for managing your HSA spending and receipts. I will be adding more features to it in the future, but it can serve as a tool for helping you maintain your HSA records and audit proof yourself in case the IRS comes knocking. Moreover, it will put you on top of your finances and help you maximize your Health Savings Account.

Note: the following section was the initial meat of this post and I am keeping it for history’s sake, in case you want to setup your own HSA record keeping on your computer.

My Old System circa 2013 (pre TrackHSA)

I update my records 4 times a year, at the end of each quarter. I can usually accomplish this record keeping in less than 1 hour per quarter. Sometimes I cheat and add QME receipts as they come in so I don’t lose them, but would like to move this to a once a quarter filing system.

In my Dropbox folder, I have a folder called HSA with the following subfolders:

  • Statements
  • Unreimbursed QME
  • Reimbursed QME

Here is what this folder looks like.  The green check marks mean it is synced to Dropbox and up to date.

Photo of HSA folder, with labled subfolders


The function and characteristics of each folder are such:

    • Statements– I download my quarterly statement from HSA Bank, my HSA provider. This details all account contributions and withdrawals that occurred in a given quarter.  It is a good reference and could help reconcile your account as needed.

      I label my statements in the format [HSA Statement 1 2012], where the first number denotes the quarter.


    • Unreimbursed QME– I keep copies of all invoices or receipts for QME that I have incurred throughout the year.  In this folder are items that are unreimbursed.  In other words, I paid for medical care out of pocket instead of using my HSA.  Doing so allows my HSA to grow and compound.  I save each receipt by either scanning (old school) the invoice or taking a clean picture (new school) using my camera.  I name the files in the format of [Date-Company-Amount] (e.g. 2012-12 Kaiser $45) so I can sort through them quickly.

      A nice benefit of this system is that the sum of all invoices in the Unreimbursed QME folder equals the amount I can pull from my HSA tax-free.


    • Reimbursed QME – This folder contains copies of invoices or receipts that I have paid for with my HSA.  There are two ways that I can pay using my HSA.  The simplest way is to buy using my HSA Bank debit card.  This is straightforward and doesn’t require any further accounting; the receipt begins and ends in Reimbursed QME. However, that money is now gone from my HSA.

      Alternatively, I can purchase the medical care out of pocket using cash, credit card, or check.  Since the purchase was considered a Qualified Medical Expense, I can reimburse myself for that purchase from my HSA (tax free dollars).  This is effectively the same as paying for the QME with my HSA.  However, I may choose to delay that reimbursement so my HSA funds can grow.

      Using this method, once the reimbursement ($ transfer from HSA to my personal checking account) occurs, I simply move the invoice from the Unreimbursed QME folder to the Reimbursed QME folder.  This finalizes that QME, and my new (lower) amount of UQME is reflected by the contents of that folder..


  • Excel Spreadsheet – I created a simple Excel spreadsheet that summarizes all out of pocket spending for qualified medical expenses.  I update this sheet when I 1) incur new UQME cost (add) or 2) reimburse myself for UQME (reduce).  This sheet conveniently shows a total for UQME, or the amount you can withdraw from your HSA, tax free. That total should balance with your receipts in your UQME folder.  You can download a free copy here.

In the end, do whatever works for you. Just make sure you have all needed information, especially the Unreimbursed QME portion.  This is money you are entitled to withdraw, tax free.  If you aren’t tracking it, who is?

There are only a few folders and a few actions that I perform once a quarter. In return, I have piece of mind of knowing the value of my accounts as well as how much I can pull from the HSA in case of emergency.  I am also covered in the event of an audit.

Let me know if you need any help getting your system setup.


TrackHSA record keeping